Roll-A-Ramp® Portable Wheel Chair Ramps
AUTOMATIC FREE SHIPPING - Expandable & Highly Portable
0.0 / 5
Roll-A-Ramp® Portable Wheel Chair Ramps Features
- FREE SHIPPING
- Proudly Made in the USA!
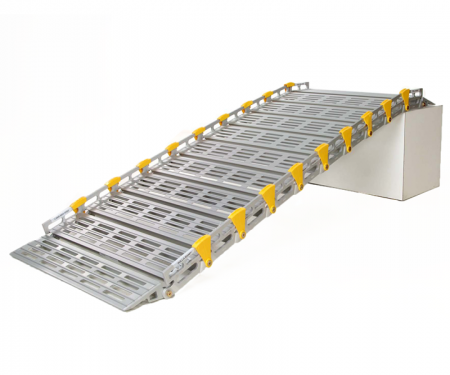
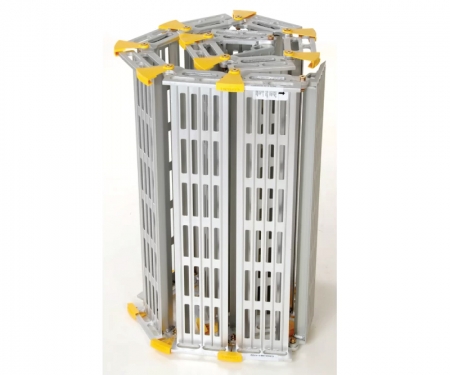
- Rolls up like a sleeping bag
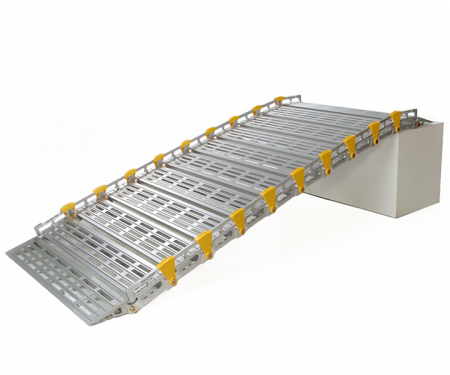
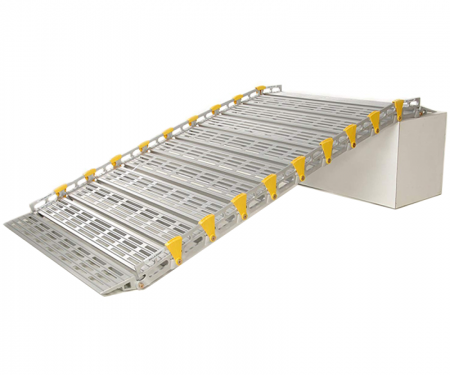
- Expandable: Add or remove links to get the length you need
- Extreme Portability: Lightweight & Easily break down for transport
- Extreme Versatility: Multiple Uses
- The ramps can change size in mere moments and be moved quickly
- Extreme Durability: Made With Aircraft Aluminum
- Supports up to 1,000lbs (Ramps 10’ or longer require an additional support stand, which are sold separately)
- Full 10 year warranty
- Custom made to order, Therefore: These Items are Non-Cancellable & NON-RETURNABLE
Please Note: Support Stands Must Be Purchased With Ramps Length Size 10 Feet Or More
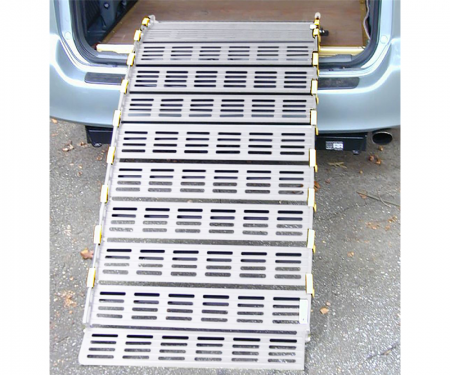
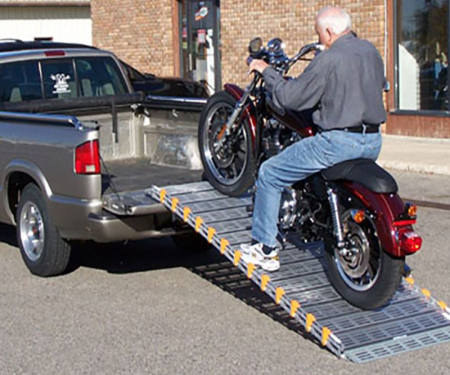
Portable ramps roll up and stow away easily. Available in any length and expandable. Portable Ramps are the affordable option to expensive or unnecessary permanent ramps. Our Van Ramps are the economical option and make more sense than expensive van conversions. Roll-A-Ramp® can be used for Wheelchairs and Scooters, freight, public entries, or anywhere accessibility is needed. The Boat Ramp is used to load passengers from shore or dock. RV Ramps keep you on the go and Home Ramps create accessibility where you need it and maybe moved from one location to another. Don't want to leave it set up? No problem! Removable Aluminum Handrails are also available for added safety and security.
Are we missing the specification you need? Please go to our Contact Us page and submit your question to us, or call 1-877-284-7760
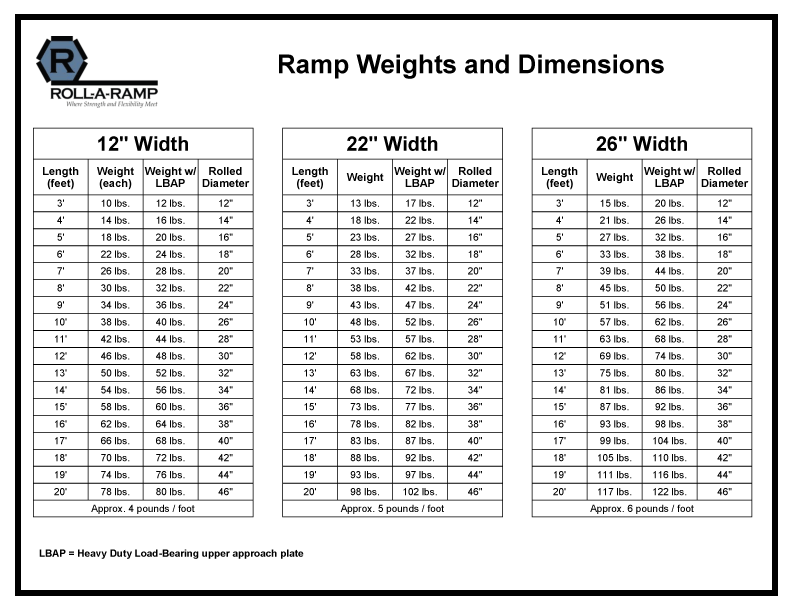
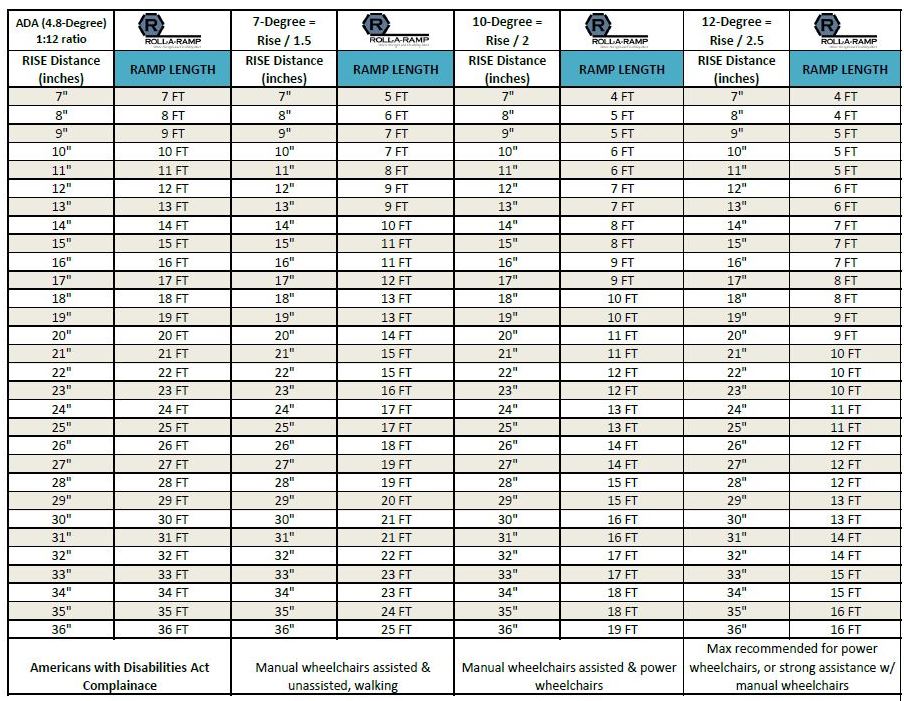
| Ramp Weight and Dimensions | Ramp Length Recommendations Based on Height |
| Click Image Below to Enlarge | Click Image Below to Enlarge |
 |  |
Unique features of Roll-A-Ramp® portable ramps:
-
- Lightweight and Strong – Aerospace 6061 aluminum supports up to 1,000 pounds or 2,000 pounds for the 12″ twin track ramps
- Portable – Roll it up and take it with you!
- Warranty – 10-year warranty on ramps
- Versatile – Any size, any time
- Split the ramp into multiple sections with Quick Connect Pins.
Six available widths:
-
- 12″ – For very wide chairs or heavy cargo. 12″ ramps are sold as pairs.
- 22″ – Useful for hand dollies or light cargo
- 26″ – Suitable for mini-van use and narrower chairs or walkers
- 30″ – Standard size for most applications
- 36″ – For public applications or larger chairs
- 48″ – Suitable for industrial needs and public use
Custom made to order, Therefore: These Items are Non-Cancellable & NON-RETURNABLE
Have a question that is not answered here? Please go to our Contact Us page and submit your question to us.
Q: Why should I buy a
Roll-A-Ramp® over some other product?
A: There are many reasons why Roll-A-Ramp® is the premiere choice for portable, van, and home ramps.
a) Versatility. Unlike other products on the market, the Roll-A-Ramp® is much more versatile and can be used in more situations, for more uses. You can add additional length by simply attaching extra sections. This means you never have the wrong size ramp! It can be changed and reconfigured to meet your exact need.
b) The width you need. Ramps come in the following widths of 12” (sold in pairs), 22″, 26”, 30”, 36” and 48″ wide.
c) Rolls up – easy to use and store. Stores in very little space – no need to wrestle with heavy folding ramps that are hard to handle.
d) Multiple ramps in one: Any Roll-A-Ramp® can be quickly and easily split into different length sections. The section can be used as a shorter additional ramp.
Q: Which width should I choose?
A: If using the ramp for wheelchair or scooter access, measure the wheelbase of the chair (inches from outside the left wheel to outside the right wheel). Determine the right ramp width for your needs.
Q: How much does the ramp weigh?
A: Since the ramps can be any length, and you can add links if you need to, use the following to determine the weight based on the width of the ramp you need:
- 48” ramp – 8 pounds per foot
- 36″ ramp = 7 pounds per foot
- 30″ ramp = 6 pounds per foot
- 26″ ramp = 6 pounds per foot
- 22” ramp = 5 pounds per foot
- 12″ ramp = 4 pounds per foot
Q: What is the Roll-A-Ramp® made of?
A: Our ramps are made from aerospace 6061-T6 aluminum. The same material military jets are made of, the highest quality aluminum raw material available. It is hardened to the Rockwell Hardness factor of T6 which means it has the hardness of steel. Plus, it is anodized which makes it stronger, last longer, prevents corrosion and makes for clean handling.
Q: Can you custom make a different width?
A: No – We are not able make custom widths.
Q: Does Roll-A-Ramp meet ADA guidelines?
A: Roll-A-Ramp® is unique because it can be built to any length. Roll-A-Ramp® is flexible in that it can be built to ADA specifications 12:1 (1′ of ramp per 1″ of rise). However, this length is typically not needed in most locations nor is it feasible in most home locations. Ramp length will depend on your situation and your individual need. Because it is a portable ramp, it is not required to comply with ADA guidelines
Q: How does the ramp stay in place?
There are three options:
Approach plate and link: Each ramp comes with a standard approach plate on each end. The approach plate and one link of the ramp should be on the top of the ramp so that the weight of the ramp is secured to the destination surface.
Heavy-duty approach plate: A heavy-duty 6” approach plate may replace the standard upper approach plate, which is included on all ramps. This piece is made of steel instead of aerospace aluminum and is designed to bear weight. If space on the destination surface is limited, this can be a great solution – although it will add about 10 pounds and some additional cost.
Z-Mount brackets: These Z-shaped brackets (also called Seg-Mount brackets) can be attached to the front of the top stair or destination surface. The standard upper approach plate slides into the brackets making the ramp level with the destination surface.
Q: Does the ramp come with approach plates?
A: Yes. Approach plates make it possible for wheelchairs, for example, to smoothly get on and off the ramp. All ramps come with a standard approach plate on the top and bottom and both are included in the overall length of the ramp. For example, an 8’ ramp will be comprised of a 6” standard approach plate on the top and and another one on the bottom and 14 links. An 8’ ramp (with two 6” approach plates) will have 7’ of usable ramp.
Q: Do longer ramps need extra support?
Ramps that are 11’ and longer need support stands. The stands should be placed at 6-7 foot increments. Ramps of this length without support stands will not have the 1,000 pounds capacity and may feel springy when used.
Looking for a quotation ? We would be happy to help by providing a quick response, inventory status, and Volume Level pricing, when available. Please fill out the form below and a representative will be in touch with you within hours to one business day to answer any questions and quote your request.
Ramp Assembly Instructions
Thank you for purchasing the Roll-A-Ramp®. You have ordered a length that requires minimal assembly. Please follow these step-by-step instructions to assemble your ramp into its final length.
Step 1: Remove both sections of the ramp from their individual boxes taking special note of “TOP” section and “BOTTOM” section as noted on the boxes.
Step 2: Identify the Owners Manual and tools to assemble your ramp. Also, identify any accessories that you ordered with your ramp. The accessories will be included in a separate cardboard box inside one of the sections of ramp or in the zip-lock bag with your Owners Manual.
Step 3: Remove zip-ties from the ramp sections and then place the ramp on edge and roll out. Place on a flat surface with the top surface of the ramp down.
Step 4: Place two sections close together. One section of the ramp will have a bolt, caution cover and nut attached through the bolt holes. Remove this hardware and move the two sections together so that the tabs are overlapping on both sides and the sides of the ramp are even.
Step 5: Insert bolt with yellow caution cover through both holes. This may take some maneuvering to line up the holes. Put on nut. *If Positive Lock Pins were ordered as an accessory with your ramp, insert them at this step instead of bolts.
Step 6: Locate box wrench and allen wrench from your Owners Manual packet. Use these tools to tighten the connection on the ramp. Do not over-tighten. Position the caution cover over the pinch point on the side of the ramp. This concludes the assembly of your Roll-A-Ramp®. Always read your Owners Manual prior to use.
Support Stand Installation Instructions
Step 1: Set up ramp to desired location.
Step 2: Place support stands under ramp at midway point (or every 6 - 8 ft) and adjust height so that support stands are same height as ramp.
Step 3: Place ramp bracket onto the railing on the bottom of the ramp spanning between 2 links.
Step 4: Tighten bolts for secure placement and adjust height with adjustment pins & fine adjustment threads. Then use your new ramp system is ready to use.
Product Details
Portable ramps roll up and stow away easily. Available in any length and expandable. Portable Ramps are the affordable option to expensive or unnecessary permanent ramps. Our Van Ramps are the economical option and make more sense than expensive van conversions. Roll-A-Ramp® can be used for Wheelchairs and Scooters, freight, public entries, or anywhere accessibility is needed. The Boat Ramp is used to load passengers from shore or dock. RV Ramps keep you on the go and Home Ramps create accessibility where you need it and maybe moved from one location to another. Don't want to leave it set up? No problem! Removable Aluminum Handrails are also available for added safety and security.
Product Specifications
Are we missing the specification you need? Please go to our Contact Us page and submit your question to us, or call 1-877-284-7760
| Ramp Weight and Dimensions | Ramp Length Recommendations Based on Height |
| Click Image Below to Enlarge | Click Image Below to Enlarge |
 |  |
Unique features of Roll-A-Ramp® portable ramps:
-
- Lightweight and Strong – Aerospace 6061 aluminum supports up to 1,000 pounds or 2,000 pounds for the 12″ twin track ramps
- Portable – Roll it up and take it with you!
- Warranty – 10-year warranty on ramps
- Versatile – Any size, any time
- Split the ramp into multiple sections with Quick Connect Pins.
Six available widths:
-
- 12″ – For very wide chairs or heavy cargo. 12″ ramps are sold as pairs.
- 22″ – Useful for hand dollies or light cargo
- 26″ – Suitable for mini-van use and narrower chairs or walkers
- 30″ – Standard size for most applications
- 36″ – For public applications or larger chairs
- 48″ – Suitable for industrial needs and public use
Product Manuals
Ramp Assembly Instructions
Thank you for purchasing the Roll-A-Ramp®. You have ordered a length that requires minimal assembly. Please follow these step-by-step instructions to assemble your ramp into its final length.
Step 1: Remove both sections of the ramp from their individual boxes taking special note of “TOP” section and “BOTTOM” section as noted on the boxes.
Step 2: Identify the Owners Manual and tools to assemble your ramp. Also, identify any accessories that you ordered with your ramp. The accessories will be included in a separate cardboard box inside one of the sections of ramp or in the zip-lock bag with your Owners Manual.
Step 3: Remove zip-ties from the ramp sections and then place the ramp on edge and roll out. Place on a flat surface with the top surface of the ramp down.
Step 4: Place two sections close together. One section of the ramp will have a bolt, caution cover and nut attached through the bolt holes. Remove this hardware and move the two sections together so that the tabs are overlapping on both sides and the sides of the ramp are even.
Step 5: Insert bolt with yellow caution cover through both holes. This may take some maneuvering to line up the holes. Put on nut. *If Positive Lock Pins were ordered as an accessory with your ramp, insert them at this step instead of bolts.
Step 6: Locate box wrench and allen wrench from your Owners Manual packet. Use these tools to tighten the connection on the ramp. Do not over-tighten. Position the caution cover over the pinch point on the side of the ramp. This concludes the assembly of your Roll-A-Ramp®. Always read your Owners Manual prior to use.
Support Stand Installation Instructions
Step 1: Set up ramp to desired location.
Step 2: Place support stands under ramp at midway point (or every 6 - 8 ft) and adjust height so that support stands are same height as ramp.
Step 3: Place ramp bracket onto the railing on the bottom of the ramp spanning between 2 links.
Step 4: Tighten bolts for secure placement and adjust height with adjustment pins & fine adjustment threads. Then use your new ramp system is ready to use.
Frequently Asked Questions
Have a question that is not answered here? Please go to our Contact Us page and submit your question to us.
Q: Why should I buy a
Roll-A-Ramp® over some other product?
A: There are many reasons why Roll-A-Ramp® is the premiere choice for portable, van, and home ramps.
a) Versatility. Unlike other products on the market, the Roll-A-Ramp® is much more versatile and can be used in more situations, for more uses. You can add additional length by simply attaching extra sections. This means you never have the wrong size ramp! It can be changed and reconfigured to meet your exact need.
b) The width you need. Ramps come in the following widths of 12” (sold in pairs), 22″, 26”, 30”, 36” and 48″ wide.
c) Rolls up – easy to use and store. Stores in very little space – no need to wrestle with heavy folding ramps that are hard to handle.
d) Multiple ramps in one: Any Roll-A-Ramp® can be quickly and easily split into different length sections. The section can be used as a shorter additional ramp.
Q: Which width should I choose?
A: If using the ramp for wheelchair or scooter access, measure the wheelbase of the chair (inches from outside the left wheel to outside the right wheel). Determine the right ramp width for your needs.
Q: How much does the ramp weigh?
A: Since the ramps can be any length, and you can add links if you need to, use the following to determine the weight based on the width of the ramp you need:
- 48” ramp – 8 pounds per foot
- 36″ ramp = 7 pounds per foot
- 30″ ramp = 6 pounds per foot
- 26″ ramp = 6 pounds per foot
- 22” ramp = 5 pounds per foot
- 12″ ramp = 4 pounds per foot
Q: What is the Roll-A-Ramp® made of?
A: Our ramps are made from aerospace 6061-T6 aluminum. The same material military jets are made of, the highest quality aluminum raw material available. It is hardened to the Rockwell Hardness factor of T6 which means it has the hardness of steel. Plus, it is anodized which makes it stronger, last longer, prevents corrosion and makes for clean handling.
Q: Can you custom make a different width?
A: No – We are not able make custom widths.
Q: Does Roll-A-Ramp meet ADA guidelines?
A: Roll-A-Ramp® is unique because it can be built to any length. Roll-A-Ramp® is flexible in that it can be built to ADA specifications 12:1 (1′ of ramp per 1″ of rise). However, this length is typically not needed in most locations nor is it feasible in most home locations. Ramp length will depend on your situation and your individual need. Because it is a portable ramp, it is not required to comply with ADA guidelines
Q: How does the ramp stay in place?
There are three options:
Approach plate and link: Each ramp comes with a standard approach plate on each end. The approach plate and one link of the ramp should be on the top of the ramp so that the weight of the ramp is secured to the destination surface.
Heavy-duty approach plate: A heavy-duty 6” approach plate may replace the standard upper approach plate, which is included on all ramps. This piece is made of steel instead of aerospace aluminum and is designed to bear weight. If space on the destination surface is limited, this can be a great solution – although it will add about 10 pounds and some additional cost.
Z-Mount brackets: These Z-shaped brackets (also called Seg-Mount brackets) can be attached to the front of the top stair or destination surface. The standard upper approach plate slides into the brackets making the ramp level with the destination surface.
Q: Does the ramp come with approach plates?
A: Yes. Approach plates make it possible for wheelchairs, for example, to smoothly get on and off the ramp. All ramps come with a standard approach plate on the top and bottom and both are included in the overall length of the ramp. For example, an 8’ ramp will be comprised of a 6” standard approach plate on the top and and another one on the bottom and 14 links. An 8’ ramp (with two 6” approach plates) will have 7’ of usable ramp.
Q: Do longer ramps need extra support?
Ramps that are 11’ and longer need support stands. The stands should be placed at 6-7 foot increments. Ramps of this length without support stands will not have the 1,000 pounds capacity and may feel springy when used.
Videos
Custom made to order, Therefore: These Items are Non-Cancellable & NON-RETURNABLE


